...
If you have an SSD, I'd suggest enabling the fstrim.timer service for TRIM:
...
| language | bash |
|---|
.
See Enable periodic TRIM - including on a LUKS partition.
...
Trackpad setup
With i3 my hands hardly leave the keyboard and almost never reach for the mouse. As such, I generally use my touchpad. My preference is to disable mouse tapping, use 'natural scrolling' and disable 'horizontal scrolling'. Although you can set all these settings using Manjaro i3's bmenu (mod+ctrl+b, and choose 'Hardware and drivers' → 'Configure touchpad'), these settings will not survive a reboot.
...
Now let's backup and then remove the current libinput touchpad conf file (which in my case was 30-touchpad.conf).
| Code Block | ||
|---|---|---|
| ||
sudo mv 30-touchpad.conf 30-touchpad.conf.backup |
...
Note you'll need to reboot or restart x for X for the changes to take place.
...
Volume control
On one of my machines there was a very annoying "beep" sound that played whenever I did stuff (like hitting backspace too much in the terminal). This got annoying pretty quickly.all my laptops, I've been able to control volume with the standard volume up/down/mute keys (e.g. fn+f1 etc.) by installing volumeicon with
| Code Block | ||
|---|---|---|
| ||
sudo pacman -S volumeicon |
Once installed you'll need to add the following to your i3 configI couldn't find a setting to disable this. After some research it appears to be an X11 session property which can be disabled by running the following from terminal:
| Code Block | ||
|---|---|---|
| ||
xsetexec -b-no-startup-id volumeicon |
Disable "beep" sound in terminal application
On one of my machines there was a very annoying "beep" sound that played whenever I did stuff (like hitting backspace too much in the terminal). This got annoying pretty quickly.
I couldn't find a setting to disable this. After some research it appears to be an X11 session property which can be disabled by running the following from terminal:
| Code Block | ||
|---|---|---|
| ||
xset -b |
You can make this stick after reboot by You can make this stick after reboot by editing /etc/xprofile or ~/.xprofile (user specific setting) and adding the above command to either file. If either file does not exist just create one.
Fixing Screen tearing (with
...
Picom)
| Info |
|---|
On |
...
Arch the Compton composite manager was recently renamed to Picom. This article has been updated to reflect this. |
| Info | |||||||
|---|---|---|---|---|---|---|---|
This requires the picom package to be installed (and active). If you don't have this installed, do:
To activate it from i3wm, add this line to your i3 config:
|
On one my laptops (Thinkpad e480) there was noticable screen tearing with picom enabled. To eliminate the screen tearing found there were several tweaks needed to the ~/.config/picom.conf configuration file. Below are the changes needed (note you'll need to replace the original settings below with these ones):
| Code Block |
|---|
backend = "glx";
...
vsync = "opengl-swc"; |
Fixing QT5 applications (like VLC) UI scaling (if icons, fonts are too big)
On my Mi3 setup, I noticed that QT5 applications like VLC
| Code Block |
|---|
backend = "glx";
...
vsync = "opengl-swc"; |
Fixing QT5 applications (like VLC) UI scaling (if icons, fonts are too big)
On my Mi3 setup, I noticed that QT5 applications like VLC had huge icons and fonts were all messed up. Now, I don't have a HiDPI screen (screen resolution is 1920x1080) but still had this issue. Here's what ended up fixing this for me:
...
I sometimes prefer to hibernate my system, but unfortunately on one of my default Mi3 install machines hibernation wasn't working. This may be because in this instance I didn't use a separate swap partition and instead opted to simply use a swap file for swap needs.
First just check that you can hibernate (mod+0, followed by h). If you can, then there's no need to do the below. If you can't, continue (below).
Let's first enable hibernation. To setup hibernate we're going to install the hibernator package and run it as root:
| Code Block |
|---|
sudo pacman -S hibernator
sudo hibernator |
Once the hibernator script has run you should have the requirements for hibernate to work.
If you're using a swap file (as opposed to a swap partition) then we'll need to do a bit more work. I assume there that you're using grub as you're boot loader.
We're going to be editing /etc/default/grub. Note that there is scope here to mess things up royally. So, let's backup our current grub file to be safe(r)
| Code Block | ||
|---|---|---|
| ||
sudo cp /etc/default/grub /etc/default/grub.backup |
So, before we can edit our grub, we need a few pieces of information:
- device name of parition where have swap file;
- physical offset of
/swapfile(which is my swap file).
For (1), we can simply run df and find the partition where our swap file is (which will usually be the same partition as Mi3 is installed to). In my case, running dfoutputs:
The partition where I have Mi3 installed is /dev/sda3.
For (2), we can run sudo sudo filefrag -v /swapfile. For my system doing so outputs:
The value we are after is the ext 0 physical offset as shown in the image (red rectangle).
With these pieces of information let's now edit our grub
| Code Block | ||
|---|---|---|
| ||
sudo nano /etc/default/grub |
We want to find the lines starting with GRUB_CMDLINE_LINUX (which was line 5 in my case) and add the following with the bits of information previously outlined:
| Code Block |
|---|
GRUB_CMDLINE_LINUX="resume=/dev/sda3 resume_offset=249856" |
Now, we can save our changes and then run
| Code Block | ||
|---|---|---|
| ||
sudo update-grub |
Reboot and hibernation should hopefully now be working. GIve it a go.
Stop Razer Blade 15 waking right after sleep
One of my (nicer) machines (Razer Blade 15) wouldn't sleep, or at least stay asleep (kind of like my kids...). It would immediately wake after trying to sleep. Apparently, it's caused by the USB 3.0 chip used on the machine.
You can fix this by running (see Arch wiki here):
| Code Block | ||
|---|---|---|
| ||
echo XHC | sudo tee /proc/acpi/wakeup |
However, this needs to be run after every startup. Let's use systemd to run this as a service.
First, create a service file by:
| Code Block | ||
|---|---|---|
| ||
sudo nano /etc/systemd/system/xhc-sleep.service |
and paste the following:
| Code Block | ||
|---|---|---|
| ||
[Unit]
Description=Workaround for razer blade 15 waking after sleeping (USB 3.0 causing).

[Service]
ExecStart=echo XHC | tee /proc/acpi/wakeup

[Install]
WantedBy=multi-user.target |
Now, let's enable and start the service:
| Code Block | ||
|---|---|---|
| ||
sudo systemctl enable xhc-sleep.service
sudo systemctl start xhc-sleep.service |
| Info |
|---|
Note, even with this, after first starting up and then (the first) sleep - my machine wakes up immediately (unless I close my lid, which makes it stay asleep). After that first "wake-up" it will now sleep properly (i.e. not wakeup automatically). |
Set default applications
We can generally set default (or preferred applications) in Mi3 by using the morec_menu (mod+z). Navigate with mod+z → settings → preferred applications. However, in my case, even setting my preferred browser to chrome (or chromium) didn't stick.
What did work though was modifying the ~/.config/mimeapps.list and replacing the default userapp-Pale Moon.desktop reference with google-chrome.desktop.
Alternatively, you can set the default http and https xdg-mime applications with:
| Code Block |
|---|
xdg-mime default <browser>.desktop x-scheme-handler/http
xdg-mime default <browser>.desktop x-scheme-handler/https |
where you can replace <browser> with you installed browser (e.g. pale-moon, firefox, chromium etc.).
Unlocking gnome-keyring on login
On many DEs that use gnome-keyring to securely store credentials (like usernames and passwords) they will automatically unlock the the keyring when logging in. On i3... not so much.
To get i3 to successfully unlock your keyring on login, you'll need to use the method outlined here.
Edit /etc/pam.d/login and add the following two lines:
| Code Block |
|---|
auth       optional     pam_gnome_keyring.so
session optional pam_gnome_keyring.so auto_start |
After a restart (or logout/login) your gnome keyring should be unlocked.
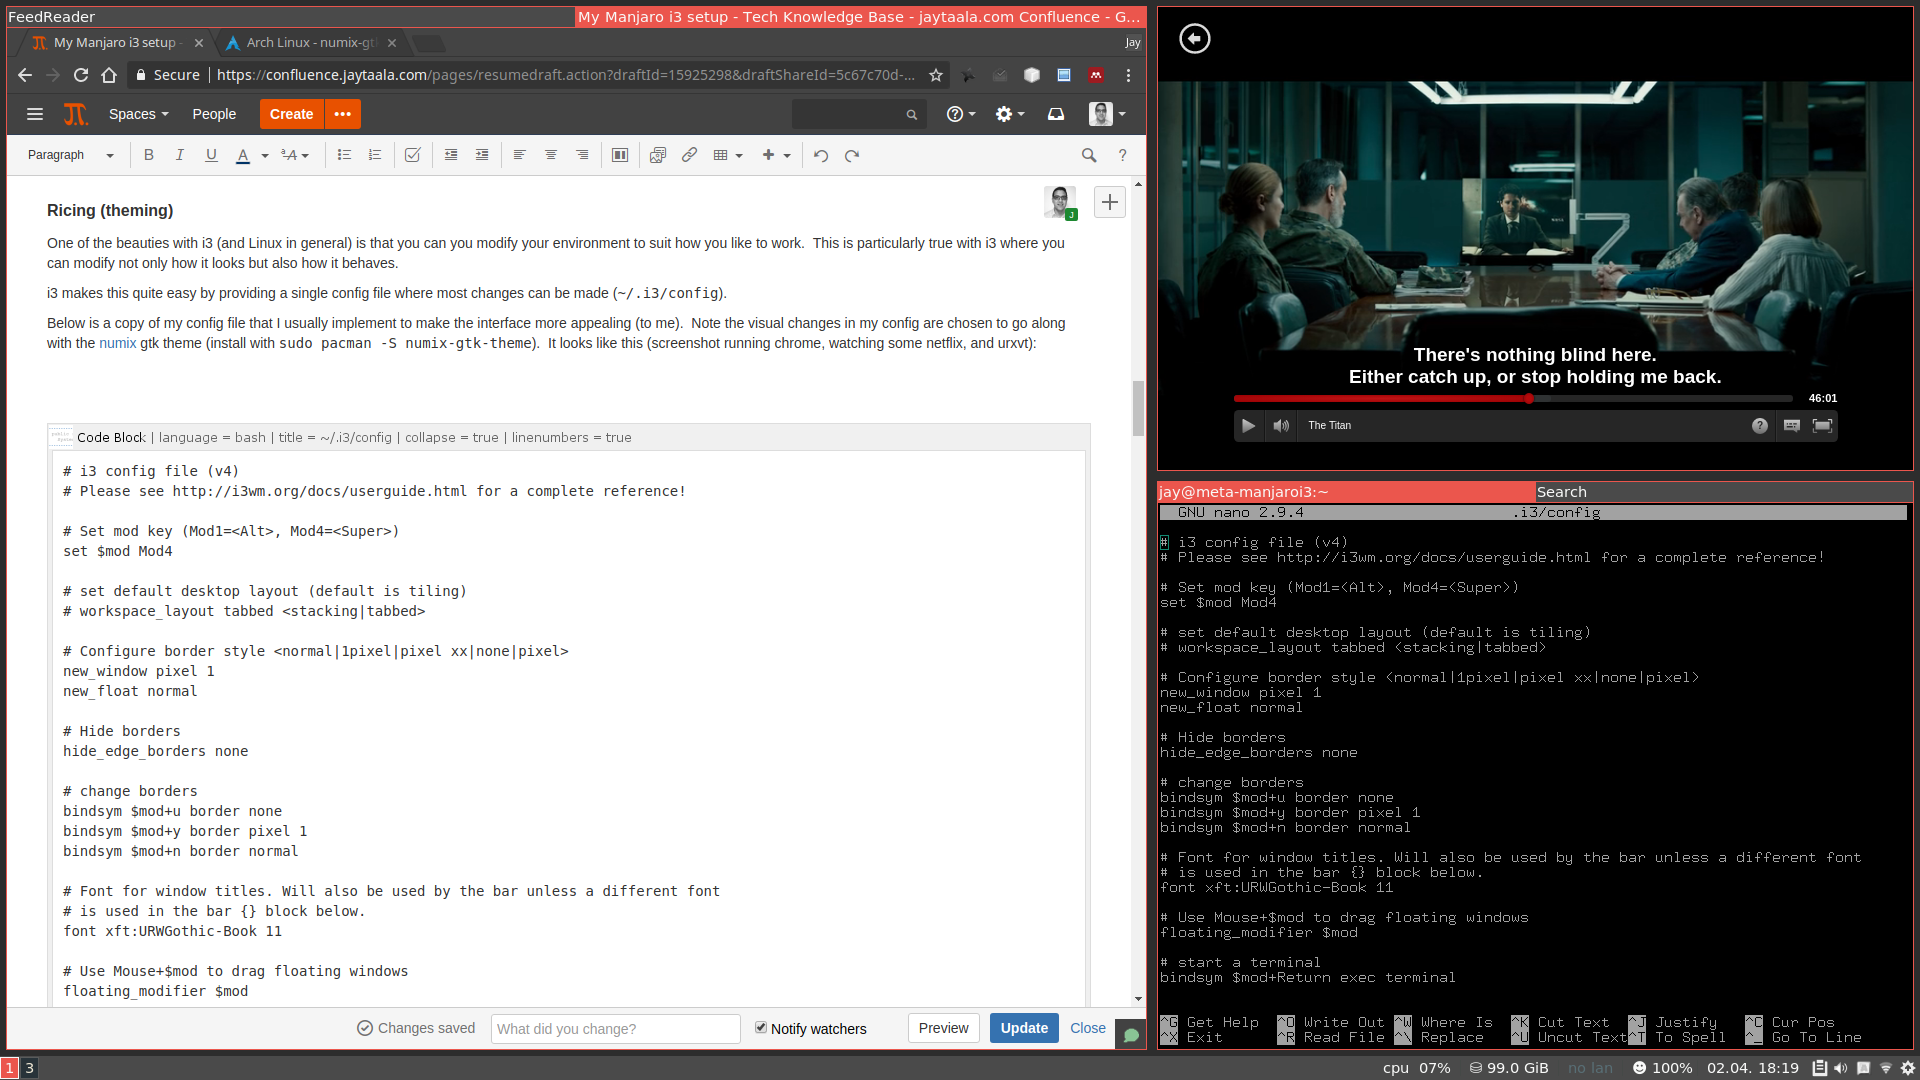
Ricing (theming) and modifying i3
One of the beauties with i3 (and Linux in general) is that you can you modify your environment to suit how you like to work. This is particularly true with i3 where you can modify not only how it looks but also how it behaves.
i3 makes this quite easy by providing a single config file where most changes can be made (~/.i3/config).
Below is a copy of my config file that I usually implement to make the interface more appealing (to me). Note the visual changes in my config are chosen to go along with the numix gtk theme (install with sudo pacman -S numix-gtk-theme). It looks like this (screenshot running chrome, watching some netflix, and working in urxvt):
My config file:
Note that this config file contains other modifications that I prefer in my i3 setup, such as:
- define mod_next at top of file: used throughout config, e.g.
mod=Mod1(i.e. super),mod_next=Mod4(i.e. alt) - conky config files (see following section)
- also using
rofi(sudo pacman -S rofi) for both window listing (mod+Tab) and as a launcher (mod+d); - using py3status instead of i3status (
sudo pacman -S py3status); - change split h/v keys to
mod+z|x(alternativelymod+mod_next+q|e) - using
mod_next+u|i|o|p|[keys for various apps (like launching pamac, chromium, bitwarden, putty, nautilus); - added resizing windows without needing resize mode and disabled resizing mode. Can also use vim style keys here;
- changes to container and splitting shortcuts;
mod+mod_next+z,mod+mod+next+xincreases/decreases current window transparency needs transset-df (sudo pacman -S transset-df);- sticky window toggle set to (
mod+ctrl+s); - added "netflix" and "spotify" window settings (
mod+mod_next+n,mod+mod_next+m); - added "redshift" mode (
mod_next+r) to help my old ninja eyes...
| Warning |
|---|
I have several bindsyms that use integrated bash scripts (i.e. not external but explicitly defined in my i3 config) which depend on |
| Info |
|---|
You'll note that I (perhaps peculiarly) use At work I'm in a rather peculiar environment where I usually have to work on a base windows environment (which I really only use for email) and then remote desktop into a variety of Linux desktops and dev environments (either running Hence, by necessity, I've moved to alt as the default mod key (since I'm a die-hard vim key fan), and now use the super key for mostly launching applications etc. On my home machines I'm under no such restrictions (and just run straight Linux environments). I did try to get used to two different configs (one at work and one at home) but my muscle memory didn't like that so I settled on the current config which I'm now used to. |
See Use a swap file and enable hibernation on Arch Linux - including on a LUKS root partition.
Stop 2018 Razer Blade 15 waking right after sleep
One of my (nicer) machines (Razer Blade 15) wouldn't sleep, or at least stay asleep (kind of like my kids...). It would immediately wake after trying to sleep. Apparently, it's caused by the USB 3.0 chip used on the machine.
You can fix this by running (see Arch wiki here):
| Code Block | ||
|---|---|---|
| ||
echo XHC | sudo tee /proc/acpi/wakeup |
However, this needs to be run after every startup. Let's use systemd to run this as a service.
First, create a service file by:
| Code Block | ||
|---|---|---|
| ||
sudo nano /etc/systemd/system/xhc-sleep.service |
and paste the following:
| Code Block | ||
|---|---|---|
| ||
[Unit]
Description=Workaround for razer blade 15 waking after sleeping (USB 3.0 causing).

[Service]
ExecStart=echo XHC | tee /proc/acpi/wakeup

[Install]
WantedBy=multi-user.target |
Now, let's enable and start the service:
| Code Block | ||
|---|---|---|
| ||
sudo systemctl enable xhc-sleep.service
sudo systemctl start xhc-sleep.service |
| Info |
|---|
Note, even with this, after first starting up and then (the first) sleep - my machine wakes up immediately (unless I close my lid, which makes it stay asleep). After that first "wake-up" it will now sleep properly (i.e. not wakeup automatically). |
Stop 2019 Razer Blade 15 infinite suspend loop
On my 2019 Razer Blade 15, it would wake from suspend correctly on the first suspend after a boot. Thereafter when it woke it would, after about 10 seconds, sleep again ad infinitum.
The ArchWiki gives the workaround for this issue in the form of a kernel parameter:
append the following kernel parameter to the GRUB_CMDLINE_LINUX_DEFAULT line in /etc/default/grub:
| Code Block |
|---|
button.lid_init_state=open |
After appending if should look something like line 4 in:
| Code Block | ||
|---|---|---|
| ||
GRUB_DEFAULT=saved
GRUB_TIMEOUT=5
GRUB_DISTRIBUTOR='Manjaro'
GRUB_CMDLINE_LINUX_DEFAULT="quiet resume=UUID=f68ed3c5-da10-4288-890f-b83d8763e85e nvidia-drm.modeset=1 button.lid_init_state=open"
GRUB_CMDLINE_LINUX=""

# If you want to enable the save default function, uncomment the following
# line, and set GRUB_DEFAULT to saved.
GRUB_SAVEDEFAULT=true
... |
Save the changes and then run:
| Code Block | ||
|---|---|---|
| ||
sudo update-grub |
Set default applications
We can generally set default (or preferred applications) in Mi3 by using the morec_menu (mod+z). Navigate with mod+z → settings → preferred applications. However, in my case, even setting my preferred browser to chrome (or chromium) didn't stick.
What did work though was modifying the ~/.config/mimeapps.list and replacing the default userapp-Pale Moon.desktop reference with google-chrome.desktop.
Alternatively, you can set the default http and https xdg-mime applications with:
| Code Block |
|---|
xdg-mime default <browser>.desktop x-scheme-handler/http
xdg-mime default <browser>.desktop x-scheme-handler/https |
where you can replace <browser> with you installed browser (e.g. pale-moon, firefox, chromium etc.).
Unlocking gnome-keyring on login
On many DEs that use gnome-keyring to securely store credentials (like usernames and passwords) they will automatically unlock the the keyring when logging in. On i3... not so much.
To get i3 to successfully unlock your keyring on login, you'll need to use the method outlined here.
Edit /etc/pam.d/login and add the following two lines:
| Code Block |
|---|
auth       optional     pam_gnome_keyring.so
session optional pam_gnome_keyring.so auto_start |
After a restart (or logout/login) your gnome keyring should be unlocked.
Ricing (theming) and modifying i3
One of the beauties with i3 (and Linux in general) is that you can you modify your environment to suit how you like to work. This is particularly true with i3 where you can modify not only how it looks but also how it behaves.
i3 makes this quite easy by providing a single config file where most changes can be made (~/.i3/config).
Below is a copy of my config file that I usually implement to make the interface more appealing (to me). Note the visual changes in my config are chosen to go along with the numix gtk theme (install with sudo pacman -S numix-gtk-theme). It looks like this (screenshot running chrome, watching some netflix, and working in urxvt):
Note you don't have to be using manjaro-i3 to use this config. If you're using stock Manjaro (or Arch) please ensure you have at least the following packages installed: i3-wm (or i3-gaps if you want dem' gaps), i3exit, i3status, py3status, and picom. You can install all these packages with:
| Code Block | ||
|---|---|---|
| ||
sudo pacman -S i3-wm i3exit i3status py3status picom |
My config file:
Note that this config file contains other modifications that I prefer in my i3 setup, such as:
- define mod_next at top of file: used throughout config, e.g.
mod=Mod1(i.e. super),mod_next=Mod4(i.e. alt) - conky config files (see following section)
- also using
rofi(sudo pacman -S rofi) for both window listing (mod+Tab) and as a launcher (mod+d); - using py3status instead of i3status (
sudo pacman -S py3status); - change split h/v keys to
mod+z|x(alternativelymod+mod_next+q|e) - using
mod_next+u|i|o|p|[keys for various apps (like launching pamac, chromium, bitwarden, putty, nautilus); - added resizing windows without needing resize mode and disabled resizing mode. Can also use vim style keys here;
- changes to container and splitting shortcuts;
mod+mod_next+z,mod+mod+next+xincreases/decreases current window transparency needs transset-df (sudo pacman -S transset-df);- sticky window toggle set to (
mod+ctrl+s); - added "netflix" and "spotify" window settings (
mod+mod_next+n,mod+mod_next+m); - added "redshift" mode (
mod_next+r) to help my old ninja eyes...
| Warning |
|---|
I have several bindsyms that use integrated bash scripts (i.e. not external but explicitly defined in my i3 config) which depend on |
| Info |
|---|
You'll note that I (perhaps peculiarly) use At work I'm in a rather peculiar environment where I usually have to work on a base windows environment (which I really only use for email) and then remote desktop into a variety of Linux desktops and dev environments (either running Hence, by necessity, I've moved to alt as the default mod key (since I'm a die-hard vim key fan), and now use the super key for mostly launching applications etc. On my home machines I'm under no such restrictions (and just run straight Linux environments). I did try to get used to two different configs (one at work and one at home) but my muscle memory didn't like that so I settled on the current config which I'm now used to. |
| View Git file | ||||||||||||
|---|---|---|---|---|---|---|---|---|---|---|---|---|
|
DPI Scaling with .Xresource and Xft.dpi
You may want/need to change your DPI with i3. With my setup(s), I've never had success setting DPI with xrandr --dpi (which is often suggested). Instead, we can set the DPI directly by editing (or creating) ~/.Xresources.
You might need to experiment to find a DPI value that works for you. Create or edit .Xresources your preferred DPI by adding the following (in this example I've set my DPI to 88 dots per inch):
| Code Block | ||
|---|---|---|
| ||
Xft.dpi: 88 |
Override Chromium / Chrome (DPI) scaling
Recently Chromium appears to be respecting the Xft.dpi setting (which previously it didn't). My preferred DPI was a bit hard to see now in Chromium. You can override this behaviour by set setting the --force-device-scale-factor flag.
Create (or edit) the file ~/.config/chromium-flags.conf and add the following (with your preferred scaling factor):
| Info |
|---|
If you use Chrome credit (or edit) |
| Code Block | ||
|---|---|---|
| ||
--force-device-scale-factor=0.96 |
Restart your browser windows and it should now no longer be using the Xft.dpi setting.View Git file
Ricing Conky (numix theme)
...
I also like to add a bit of transparency to my alttab. You can do this by adding a rule for alttab to the opacity-rule array definition as seen in my comptonmy picom.conf:
| View Git file | ||||||||||
|---|---|---|---|---|---|---|---|---|---|---|
|
...
The following approach replaces the default inactive window transparency with compton picom dim rules. We'll also cover how modify dimming on a per window basis via a keyboard shortcuts (occasionally want to disable the default dimming on a window by window basis).
First, let's disable comptonpicom's inactive-opacity setting. Your opacity settings in comptonpicom.conf should might look something like this:
| Code Block |
|---|
# opacity settings menuinactive-opacity = 0.951; #inactiveactive-opacity = 0.931; activeframe-opacity = 1; alphainactive-opacity-stepoverride = 0.01false; opacity-rule = [ "9080:nameclass_g = 'alttabcopyq'", "8090:class_gname = 'copyqalttab'", "99 # no opacity on sticky windows "99:_NET_WM_STATE@:32a *= '_NET_WM_STATE_STICKY'" ]; |
We want to make sure that inactive-opacity is set to 1 (or disabled) and active-opacity is also set You'll note that we've disabled inactive-opacity and set active-opacity to 1. WeI've also kept a few opacity=rule rules that I want to still apply to several window types. Note the last rule above - it simply disables transparency for sticky windows (another i3 concept which allows to keep a window showing/pinned on all workspaces).
Now, let's setup default dim settings. We'll do so by adding the following settings:
| Code Block |
|---|
# dim settingsDim inactive windows. (0.0 - 1.0) inactive-dim = 0.2; # exclude treats as always focused (doesn't dim)... focus-exclude = [ "ANTIDIM_FLAG@:8c", "_NET_WM_STATE@:32a *= '_NET_WM_STATE_STICKY'", "class_g = 'Cairo-clock'" ] ]; |
Note the focus-exclude rule array. This defines rules for NOT applying dim on window types.
...
We can apply arbitrary window properties on selected windows. Compton will Picom will respect these rules (by property). The ANTIDIM_FLAG@:8c rules above (in the focus-exclude array is an example of this). To apply/remove this window property on a selected window add the following bindsyms to your i3.conf:
| Code Block |
|---|
# window dimming enable or disable (uses xdotool and xprop to set a anti-dim flag, which comptonpicom recognises in focus-exclude array) bindsym $mod+Mod1+a exec xprop -id $(xdotool getactivewindow) -f ANTIDIM_FLAG 8c -set ANTIDIM_FLAG 1; exec notify-send 'anti-dim set on window' bindsym $mod+Mod1+d exec xprop -id $(xdotool getactivewindow) -remove ANTIDIM_FLAG; exec notify-send 'dim set on window' |
...
For reference here is my ~/.config/comptonpicom.conf
| View Git file | ||||||||||||
|---|---|---|---|---|---|---|---|---|---|---|---|---|
|
...
Although you can modify transparencies etc. by editing ~/.config/comptonpicom.conf, there's no functionality to increase or decrease transparencies 'on the fly' and for specific windows only.
...
| Code Block | ||
|---|---|---|
| ||
# window transparency adjustment (and alias to restart comptonpicom) bindsym $mod+Mod1+z exec transset-df -a --min 0.25 --dec 0.25 bindsym $mod+Mod1+x exec transset-df -a --inc 0.25 bindsym $mod+Mod1+c exec --no-startup-id compton -b |
These shortcuts will increase or decrease transparency of the currently selected window by +/-25%. You might notice I also have a shortcut (mod+alt+c) for compton, which will reset start/reset compton. You'll see why next.
I prefer my sticky windows to be opaque by default, and using the above I can then change them to suit. To change the default window transparency used for sticky windows you'll need to modify your compton config (~/.config/compton.conf) and make sure it contains
| Code Block |
|---|
"99:_NET_WM_STATE@:32a *= '_NET_WM_STATE_STICKY'" |
in the opacity-rule array.
This works to my liking. However, I've found that when I want to change my sticky window back to opaque, my default inactive-opacity setting for compton kicks in (in other words, when I select something else my sticky window is not quite opaque). Resetting compton with mod+alt+c fixes this and reapplies my default transparency setting for sticky windows.
For reference here is my ~/.config/compton.conf
| View Git file | ||||||||||||
|---|---|---|---|---|---|---|---|---|---|---|---|---|
|
...
picom -b |
These shortcuts will increase or decrease transparency of the currently selected window by +/-25%. You might notice I also have a shortcut (mod+alt+c) for picom, which will reset start/reset picom. You'll see why next.
I prefer my sticky windows to be opaque by default, and using the above I can then change them to suit. To change the default window transparency used for sticky windows you'll need to modify your picom config (~/.config/picom.conf) and make sure it contains
| Code Block |
|---|
"99:_NET_WM_STATE@:32a *= '_NET_WM_STATE_STICKY'" |
in the opacity-rule array.
This works to my liking. However, I've found that when I want to change my sticky window back to opaque, my default inactive-opacity setting for picom kicks in (in other words, when I select something else my sticky window is not quite opaque). Resetting picom with mod+alt+c fixes this and reapplies my default transparency setting for sticky windows.
For reference here is my ~/.config/picom.conf
| View Git file | ||||||||||||
|---|---|---|---|---|---|---|---|---|---|---|---|---|
|
| Info |
|---|
Window Management and various other implementations in i3My usage and window management approaches in Below are just a few of the window management approaches that have stuck with me. Please note that these approaches might not work for you - and that's fine. Feel free to adapt (or disregard) them. |
Master-stack (stack-stack) swap stack window with master keybind
I find myself now generally using a "master-stack" approach to window management with i3. More specifically, I have two "stacking" layouts (horizontally) side-by-side, like so:
That is, I have a "master" stacking layout on the left and use a "stack" stacking (or splitv) layout on the right.
Now, i3 is a manual tiling manager which means that to move windows you can move window manually from the "stack" layout to the master - however it won't automatically move the current "master" to the "stack" layout when doing so (other dynamic tiling managers usually do this in a master-stack layout).
We can however, simulate this basic concept with a bindsym which will move the focused "stack" window to the right (the "master" layout), focus up (to select the currently selected "master" window), move it right, and then focus on the (now new) master window. Add the following to your i3.conf file (I've found $mod+m works well for me):
| Code Block |
|---|
# master-stack keybinding (moves stack window to master and current master back to stack window)
bindsym $mod+m exec "i3-msg \\"move left; focus up; move right; focus left\\"" |
Quick demo of using the above bindsym to switch windows in master-stack layout:
Window Management and various other implementations in i3
My usage and window management approaches in i3 have evolved over time - and continue to evolve. If you look through my dev branch you'll see many changes and things tried (and reverted) as I've slowly tried out things until I've found what works best for me. That's one the many things I love about i3 (and linux in general).
...
My "special" window combiner bindsyms
...