...
| View Git file | ||||||||||||
|---|---|---|---|---|---|---|---|---|---|---|---|---|
|
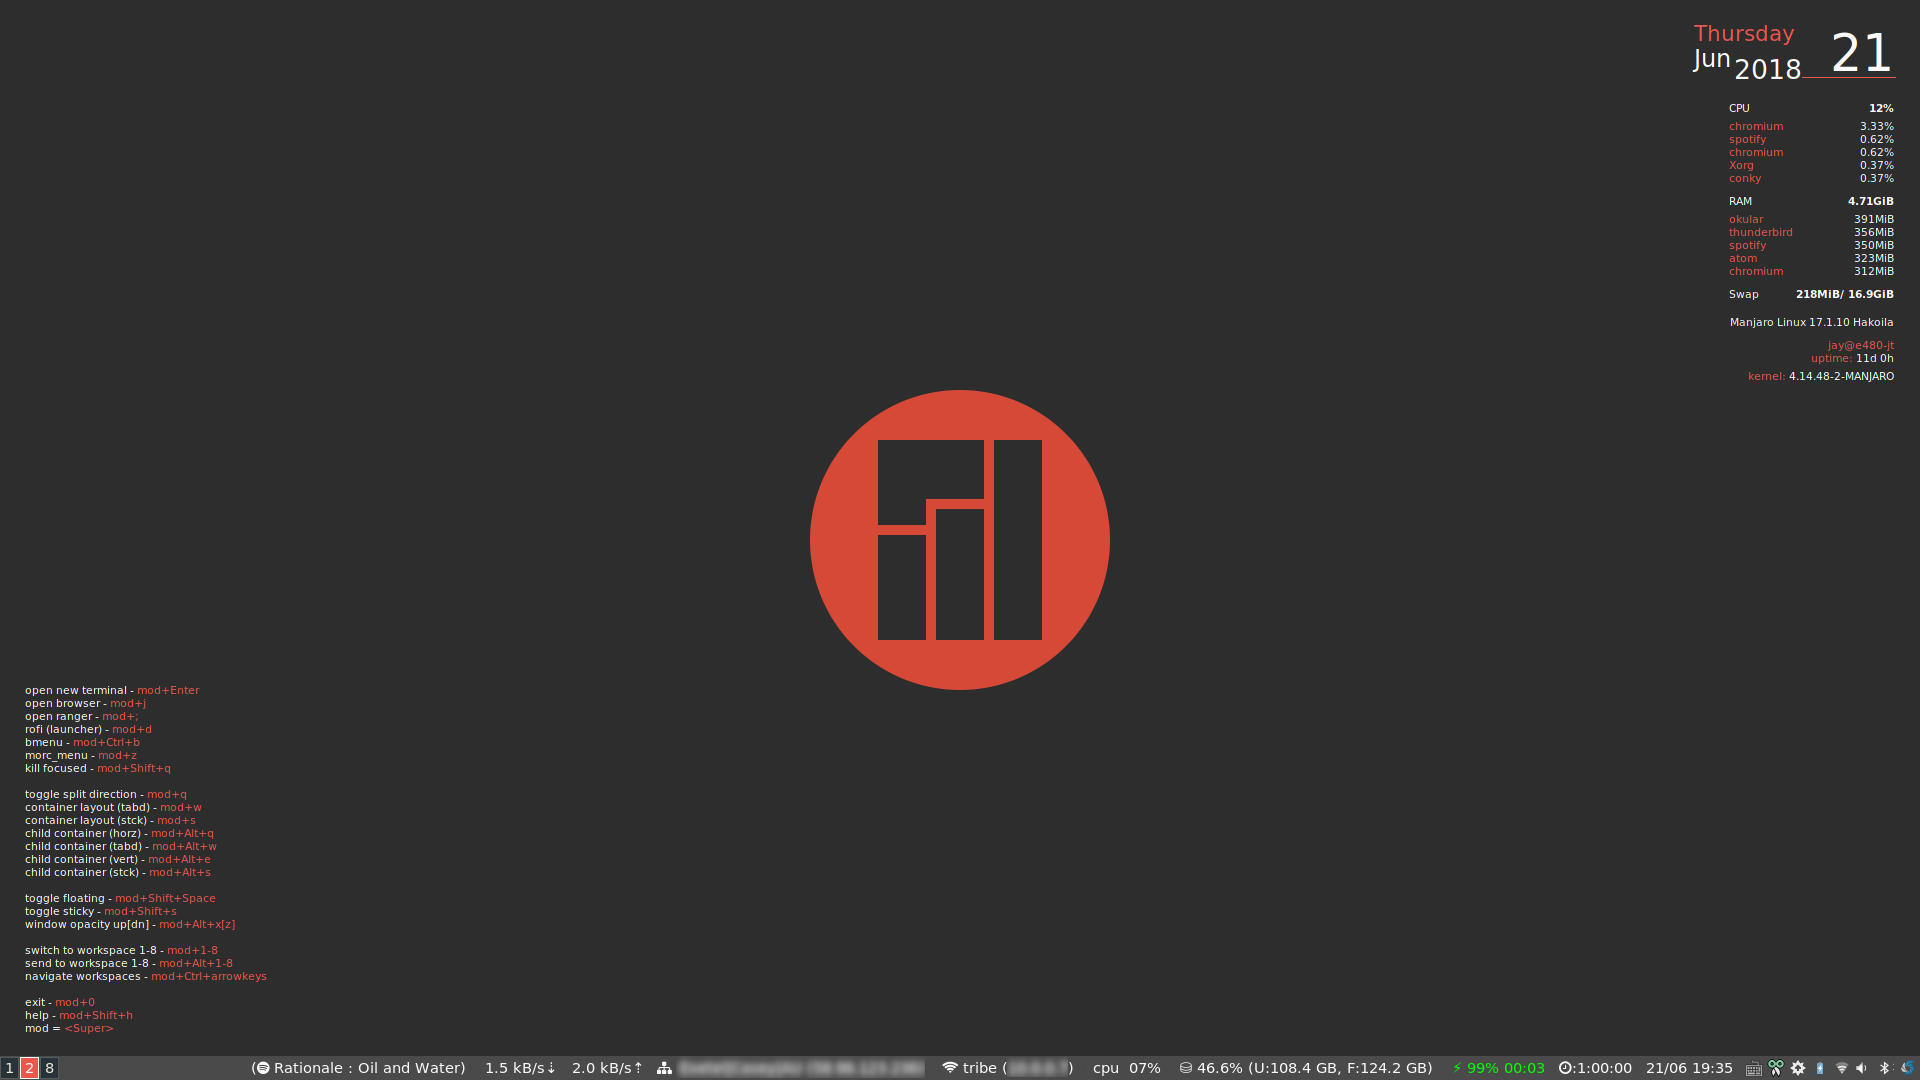
Ricing Conky (numix theme)
I've also riced my Conky setup somewhat. Most of these changes to are to match my theme and current shortcuts setup. I have two conky configs: one for showing various system stats (like cpu, RAM, swap etc.) and one showing several keyboard shortcuts. See below for screenshot of my current conky setup:
Let's start with the conky config files:
| View Git file | ||||||||||
|---|---|---|---|---|---|---|---|---|---|---|
|
| View Git file | ||||||||||
|---|---|---|---|---|---|---|---|---|---|---|
|
My main i3 config file (see preceding section) expects these conky config files to be in ~/.config (you can place them anywhere really, you'll just need to update your i3 config file to point to them).
Ricing the (standard) i3 status bar
I usually also make modifications to the i3 status bar colours for the system stats. User specific i3 status bar config is configured int he ~/.i3status.conf file. Here's is mine, with several changes including:
- default font colour change;
- disk format change (showing decimal %used / %total);
- added wlan ip address and ethernet ip address (these are hidden if not connected);
- added battery %remaining time (next to %percentage)
DPI Scaling with .Xresource and Xft.dpi
You may want/need to change your DPI with i3. With my setup(s), I've never had success setting DPI with xrandr --dpi (which is often suggested). Instead, we can set the DPI directly by editing (or creating) ~/.Xresources.
You might need to experiment to find a DPI value that works for you. Create or edit .Xresources your preferred DPI by adding the following (in this example I've set my DPI to 88 dots per inch):
| Code Block | ||
|---|---|---|
| ||
Xft.dpi: 88 |
Override Chromium / Chrome (DPI) scaling
Recently Chromium appears to be respecting the Xft.dpi setting (which previously it didn't). My preferred DPI was a bit hard to see now in Chromium. You can override this behaviour by set setting the --force-device-scale-factor flag.
Create (or edit) the file ~/.config/chromium-flags.conf and add the following (with your preferred scaling factor):
| Info |
|---|
If you use Chrome credit (or edit) |
| Code Block | ||
|---|---|---|
| ||
--force-device-scale-factor=0.96 |
Restart your browser windows and it should now no longer be using the Xft.dpi setting.
Ricing Conky (numix theme)
I've also riced my Conky setup somewhat. Most of these changes to are to match my theme and current shortcuts setup. I have two conky configs: one for showing various system stats (like cpu, RAM, swap etc.) and one showing several keyboard shortcuts. See below for screenshot of my current conky setup:
Let's start with the conky config files:
| View Git file | ||||||||||
|---|---|---|---|---|---|---|---|---|---|---|
|
| View Git file | ||||||||||||
|---|---|---|---|---|---|---|---|---|---|---|---|---|
|
Using (and ricing) py3status instead of i3status
py3status is a python wrapper for i3status that provides a lot more features and extendability. py3status gives more much control and provides some very cool modules. First, you'll need to install py3status with:
| Code Block | ||
|---|---|---|
| ||
sudo pacman -S py3status |
Once, installed you'll need to modify your ~/.i3/config file and replace the status_command i3status directive with
| Code Block |
|---|
status_command py3status -c ~/.i3status.conf |
You'll notice that we use the same .i3status.conf file (which with py3status we can define some extra modules etc.).
Before you can use my py3status config file, you'll need to install font-awesome fonts (4.7) - I had issues with version 5, but works well with v4:
| Code Block | ||
|---|---|---|
| ||
yay -S ttf-font-awesome-4 |
Below is my config file, which looks like this:

and includes p3status modules for:
- spotify;
- current network rate (download / upload);
- public ip address information (isp, city, country);
- currently connected network (wifi ssid and local ip address);
- battery (with font awesome icons);
- countdown timer;
My main i3 config file (see preceding section) expects these conky config files to be in ~/.config (you can place them anywhere really, you'll just need to update your i3 config file to point to them).
Ricing the (standard) i3 status bar
I usually also make modifications to the i3 status bar colours for the system stats. User specific i3 status bar config is configured int he ~/.i3status.conf file. Here's is mine, with several changes including:
- default font colour change;
- disk format change (showing decimal %used / %total);
- added wlan ip address and ethernet ip address (these are hidden if not connected);
- added battery %remaining time (next to %percentage)
| View Git file | ||||||||||||
|---|---|---|---|---|---|---|---|---|---|---|---|---|
| ||||||||||||
| View Git file | ||||||||||||
|
Ricing dmenu
Along with the main i3 config file, there is also a config file dmenu (main application launcher in Mi3). The appearance (colours etc.) are configured in the ~/.dmenurc file. Here is my .dmenurc config file with colours that match my main i3 config:
| View Git file | ||||||||||||
|---|---|---|---|---|---|---|---|---|---|---|---|---|
|
Ricing rofi (to match my theming)
Using (and ricing) py3status instead of i3status
py3status is a python wrapper for i3status that provides a lot more features and extendability. py3status gives more much control and provides some very cool modules. First, you'll need to install py3status with:
| Code Block | ||
|---|---|---|
| ||
sudo pacman -S py3status |
Once, installed you'll need to modify your ~/.i3/config file and replace the status_command i3status directive with
| Code Block |
|---|
status_command py3status -c ~/.i3status.conf |
You'll notice that we use the same .i3status.conf file (which with py3status we can define some extra modules etc.).
Before you can use my py3status config file, you'll need to install font-awesome fonts (4.7) - I had issues with version 5, but works well with v4:If you use rofi, as I do (see my .i3/config above), you can also change it's theme. There are a very nice selection of themes included with rofi. You can change theme by running the following from your terminal
| Code Block | ||
|---|---|---|
| ||
rofi-theme-selector |
Theme files can be found in usr/share/rofi/themes.
I really liked the lb.rasi theme (which is included with rofi). However, it didn't quite match the colours of my current theme. I made a few subtle changes to this theme (only changed colours to match what I like). Below is the resulting file, which should be placed in the rofi theme folder (see above).
yay -S ttf-font-awesome-4 |
Below is my config file, which looks like this:
and includes p3status modules for:
- spotify;
- current network rate (download / upload);
- public ip address information (isp, city, country);
- currently connected network (wifi ssid and local ip address);
- battery (with font awesome icons);
- countdown timer;
| view-view-git-file | ||||||||||||
|---|---|---|---|---|---|---|---|---|---|---|---|---|
|
Ricing
...
dmenu
Along with the main i3 config file, there is also a config file dmenu (main application launcher in Mi3). The appearance (colours etc.) are configured in the ~/.dmenurc file. Here is my .dmenurc config file with colours that match my main i3 configYou can also modify the look of the system notifications. Configure colours etc. in ~/.config/dunst/dunstrc. Here's a few small modifications to my dunstrc file (to match my theme):
| View Git file | ||||||||||||
|---|---|---|---|---|---|---|---|---|---|---|---|---|
|
| Warning |
|---|
I've disabled the default |
Ricing alttab
Ricing rofi (to match my theming)
If you use rofi, as I do (see my .i3/config above), you can also change it's theme. There are a very nice selection of themes included with rofi. You can change theme by running the following from your terminalAlthough I do like the way i3 approaches window switching - I do miss the speed of alt-tabbing for switching between the last focused application and the current application (and doing so often). For this I use the very nice alttab. It's in the AUR so once you've enabled AUR (and installed something like yay) you can do:
| Code Block | ||
|---|---|---|
| ||
sudo yay -S alttab-git |
You can customise the look of alttab by changing the background, foreground and frame colour. Below is the settings that match my numix theme. Add the following to your ~/.i3/config:
| Code Block |
|---|
exec --no-startup-id alttab -fg "#d58681" -bg "#4a4a4a" -frame "#eb564d" -t 128x150 -i 127x64 |
rofi-theme-selector |
Theme files can be found in usr/share/rofi/themes.
I really liked the lb.rasi theme (which is included with rofi). However, it didn't quite match the colours of my current theme. I made a few subtle changes to this theme (only changed colours to match what I like). Below is the resulting file, which should be placed in the rofi theme folder (see above).I also like to add a bit of transparency to my alttab. You can do this by adding a rule for alttab to the opacity-rule array definition as seen in my picom.conf:
| View Git file | ||||||||||||||
|---|---|---|---|---|---|---|---|---|---|---|---|---|---|---|
|
Ricing notifications (dunst)
You can also modify the look of the system notifications. Configure colours etc. in ~/.config/dunst/dunstrc. Here's a few small modifications to my dunstrc file (to Resulting alttab settings that match my theme):

Dim non-active windows instead of applying transparency (and implement per window dim enable/disable shortcuts)
I prefer visual identification of non-active windows by dimming rather than transparency. By default, Manjaro i3 uses a non-active window transparency as a way to help visually identify active/non-active windows. This works quite well, but I find this adds to the "visual noise" in a busy i3 session.
The following approach replaces the default inactive window transparency with picom dim rules. We'll also cover how modify dimming on a per window basis via a keyboard shortcuts (occasionally want to disable the default dimming on a window by window basis).
First, let's disable picom's inactive-opacity setting. Your opacity settings in picom.conf might look something like this:
| Code Block |
|---|
inactive-opacity = 1;
active-opacity = 1;
frame-opacity = 1;
inactive-opacity-override = false;
opacity-rule = [
    "80:class_g = 'copyq'",
    "90:name = 'alttab'",
    # no opacity on sticky windows
    "99:_NET_WM_STATE@:32a *= '_NET_WM_STATE_STICKY'"
];
|
We want to make sure that inactive-opacity is set to 1 (or disabled) and active-opacity is also set to 1. I've also kept a few opacity=rule rules that I want to still apply to several window types. Note the last rule above - it simply disables transparency for sticky windows (another i3 concept which allows to keep a window showing/pinned on all workspaces).
Now, let's setup default dim settings. We'll do so by adding the following settings:
| View Git file | ||||||||||||
|---|---|---|---|---|---|---|---|---|---|---|---|---|
|
| Warning |
|---|
I've disabled the default |
Ricing alttab
Although I do like the way i3 approaches window switching - I do miss the speed of alt-tabbing for switching between the last focused application and the current application (and doing so often). For this I use the very nice alttab. It's in the AUR so once you've enabled AUR (and installed something like yay) you can do:
| Code Block | ||
|---|---|---|
| ||
sudo yay -S alttab-git |
You can customise the look of alttab by changing the background, foreground and frame colour. Below is the settings that match my numix theme. Add the following to your ~/.i3/config:
| Code Block |
|---|
exec --no-startup-id alttab -fg "#d58681" -bg "#4a4a4a" -frame "#eb564d" -t 128x150 -i 127x64 |
I also like to add a bit of transparency to my alttab. You can do this by adding a rule for alttab to the opacity-rule array definition as seen in my picom.conf:
| View Git file | ||||||||||
|---|---|---|---|---|---|---|---|---|---|---|
|
Resulting alttab settings that match my theme:
Dim non-active windows instead of applying transparency (and implement per window dim enable/disable shortcuts)
I prefer visual identification of non-active windows by dimming rather than transparency. By default, Manjaro i3 uses a non-active window transparency as a way to help visually identify active/non-active windows. This works quite well, but I find this adds to the "visual noise" in a busy i3 session.
The following approach replaces the default inactive window transparency with picom dim rules. We'll also cover how modify dimming on a per window basis via a keyboard shortcuts (occasionally want to disable the default dimming on a window by window basis).
First, let's disable picom's inactive-opacity setting. Your opacity settings in picom.conf might look something like this:
| Code Block |
|---|
inactive-opacity = 1;
active-opacity = 1;
frame-opacity = 1;
inactive-opacity-override = false;
opacity-rule = [
    "80:class_g = 'copyq'",
    "90:name = 'alttab'",
    # no opacity on sticky windows
"99: |
| Code Block |
# Dim inactive windows. (0.0 - 1.0) inactive-dim = 0.2; ... focus-exclude = [ "ANTIDIM_FLAG@:8c", "_NET_WM_STATE@:32a *= '_NET_WM_STATE_STICKY'" ]; |
We want to make sure that inactive-opacity is set to 1 (or disabled) and active-opacity is also set to 1. I've also kept a few opacity=rule rules that I want to still apply to several Note the focus-exclude rule array. This defines rules for NOT applying dim on window types.
Notice the rule ANTIDIM_FLAG@:8c, we'll use this to NOT applying dimming by window property (which we'll apply to selected windows via an i3 keyboard shortcut).
Note the last rule above - it simply disables transparency for sticky windows (another i3 concept which allows to keep a window showing/pinned on all workspaces).
Now, let's setup default dim settings. We'll do so by adding the following settingsWe can apply arbitrary window properties on selected windows. Picom will respect these rules (by property). The ANTIDIM_FLAG@:8c rules above (in the focus-exclude array is an example of this). To apply/remove this window property on a selected window add the following bindsyms to your i3.conf:
| Code Block |
|---|
# windowDim dimming enable or disable (uses xdotool and xprop to set a anti-dim flag, which picom recognises in focus-exclude array) bindsym $mod+Mod1+a exec xprop -id $(xdotool getactivewindow) -f ANTIDIM_FLAG 8c -set ANTIDIM_FLAG 1; exec notify-send 'anti-dim set on window' bindsym $mod+Mod1+d exec xprop -id $(xdotool getactivewindow) -remove ANTIDIM_FLAG; exec notify-send 'dim set on window' |
| Info |
|---|
For the above shortcuts to work, you'll need to install |
The above shortcuts will enable the ANTIDIM property for the currently selected window (which will disable dimming on said window) or disable the ANTIDIM property (which will then respect the default dim settings defined above).
For reference here is my ~/.config/picom.conf
| View Git file | ||||||||||||
|---|---|---|---|---|---|---|---|---|---|---|---|---|
|
Enabling per window transparency with transset-df (and keybind changing it)
Using window transparencies effectively can make a big difference to the overall use and focus in managing lots of windows, especially when you might have a few sticky windows as well.
Although you can modify transparencies etc. by editing ~/.config/picom.conf, there's no functionality to increase or decrease transparencies 'on the fly' and for specific windows only.
You can achieve this with transset-df. First you'll need to install it with
| Code Block | ||
|---|---|---|
| ||
sudo pacman -S transset-df |
Once installed, using transset-df is very straightforward, for example, to set transparency to 80%, simply call
| Code Block | ||
|---|---|---|
| ||
transset-df 0.8 |
and then click on a window to set the transparency for that window.
We can do even better though with i3. In my ~/.i3/config I've added
| Code Block | ||
|---|---|---|
| ||
# window transparency adjustment (and alias to restart picom)
bindsym $mod+Mod1+z exec transset-df -a --min 0.25 --dec 0.25
bindsym $mod+Mod1+x exec transset-df -a --inc 0.25
bindsym $mod+Mod1+c exec --no-startup-id picom -b |
These shortcuts will increase or decrease transparency of the currently selected window by +/-25%. You might notice I also have a shortcut (mod+alt+c) for picom, which will reset start/reset picom. You'll see why next.
I prefer my sticky windows to be opaque by default, and using the above I can then change them to suit. To change the default window transparency used for sticky windows you'll need to modify your picom config (~/.config/picom.conf) and make sure it contains
| Code Block |
|---|
"99:_NET_WM_STATE@:32a *= '_NET_WM_STATE_STICKY'" |
in the opacity-rule array.
This works to my liking. However, I've found that when I want to change my sticky window back to opaque, my default inactive-opacity setting for picom kicks in (in other words, when I select something else my sticky window is not quite opaque). Resetting picom with mod+alt+c fixes this and reapplies my default transparency setting for sticky windows.
For reference here is my ~/.config/picom.conf
| View Git file | ||||||||||||
|---|---|---|---|---|---|---|---|---|---|---|---|---|
|
...
inactive windows. (0.0 - 1.0)
inactive-dim = 0.2;
...
focus-exclude = [
  "ANTIDIM_FLAG@:8c",
  "_NET_WM_STATE@:32a *= '_NET_WM_STATE_STICKY'"
]; |
Note the focus-exclude rule array. This defines rules for NOT applying dim on window types.
Notice the rule ANTIDIM_FLAG@:8c, we'll use this to NOT applying dimming by window property (which we'll apply to selected windows via an i3 keyboard shortcut).
We can apply arbitrary window properties on selected windows. Picom will respect these rules (by property). The ANTIDIM_FLAG@:8c rules above (in the focus-exclude array is an example of this). To apply/remove this window property on a selected window add the following bindsyms to your i3.conf:
| Code Block |
|---|
# window dimming enable or disable (uses xdotool and xprop to set a anti-dim flag, which picom recognises in focus-exclude array)
bindsym $mod+Mod1+a exec xprop -id $(xdotool getactivewindow) -f ANTIDIM_FLAG 8c -set ANTIDIM_FLAG 1; exec notify-send 'anti-dim set on window'
bindsym $mod+Mod1+d exec xprop -id $(xdotool getactivewindow) -remove ANTIDIM_FLAG; exec notify-send 'dim set on window' |
| Info |
|---|
For the above shortcuts to work, you'll need to install |
The above shortcuts will enable the ANTIDIM property for the currently selected window (which will disable dimming on said window) or disable the ANTIDIM property (which will then respect the default dim settings defined above).
For reference here is my ~/.config/picom.conf
| View Git file | ||||||||||||
|---|---|---|---|---|---|---|---|---|---|---|---|---|
|
Enabling per window transparency with transset-df (and keybind changing it)
Using window transparencies effectively can make a big difference to the overall use and focus in managing lots of windows, especially when you might have a few sticky windows as well.
Although you can modify transparencies etc. by editing ~/.config/picom.conf, there's no functionality to increase or decrease transparencies 'on the fly' and for specific windows only.
You can achieve this with transset-df. First you'll need to install it with
| Code Block | ||
|---|---|---|
| ||
sudo pacman -S transset-df |
Once installed, using transset-df is very straightforward, for example, to set transparency to 80%, simply call
| Code Block | ||
|---|---|---|
| ||
transset-df 0.8 |
and then click on a window to set the transparency for that window.
We can do even better though with i3. In my ~/.i3/config I've added
| Code Block | ||
|---|---|---|
| ||
# window transparency adjustment (and alias to restart picom)
bindsym $mod+Mod1+z exec transset-df -a --min 0.25 --dec 0.25
bindsym $mod+Mod1+x exec transset-df -a --inc 0.25
bindsym $mod+Mod1+c exec --no-startup-id picom -b |
These shortcuts will increase or decrease transparency of the currently selected window by +/-25%. You might notice I also have a shortcut (mod+alt+c) for picom, which will reset start/reset picom. You'll see why next.
I prefer my sticky windows to be opaque by default, and using the above I can then change them to suit. To change the default window transparency used for sticky windows you'll need to modify your picom config (~/.config/picom.conf) and make sure it contains
| Code Block |
|---|
"99:_NET_WM_STATE@:32a *= '_NET_WM_STATE_STICKY'" |
in the opacity-rule array.
This works to my liking. However, I've found that when I want to change my sticky window back to opaque, my default inactive-opacity setting for picom kicks in (in other words, when I select something else my sticky window is not quite opaque). Resetting picom with mod+alt+c fixes this and reapplies my default transparency setting for sticky windows.
For reference here is my ~/.config/picom.conf
| View Git file | ||||||||||||
|---|---|---|---|---|---|---|---|---|---|---|---|---|
|
| Info |
|---|
Window Management and various other implementations in i3My usage and window management approaches in Below are just a few of the window management approaches that have stuck with me. Please note that these approaches might not work for you - and that's fine. Feel free to adapt (or disregard) them. |
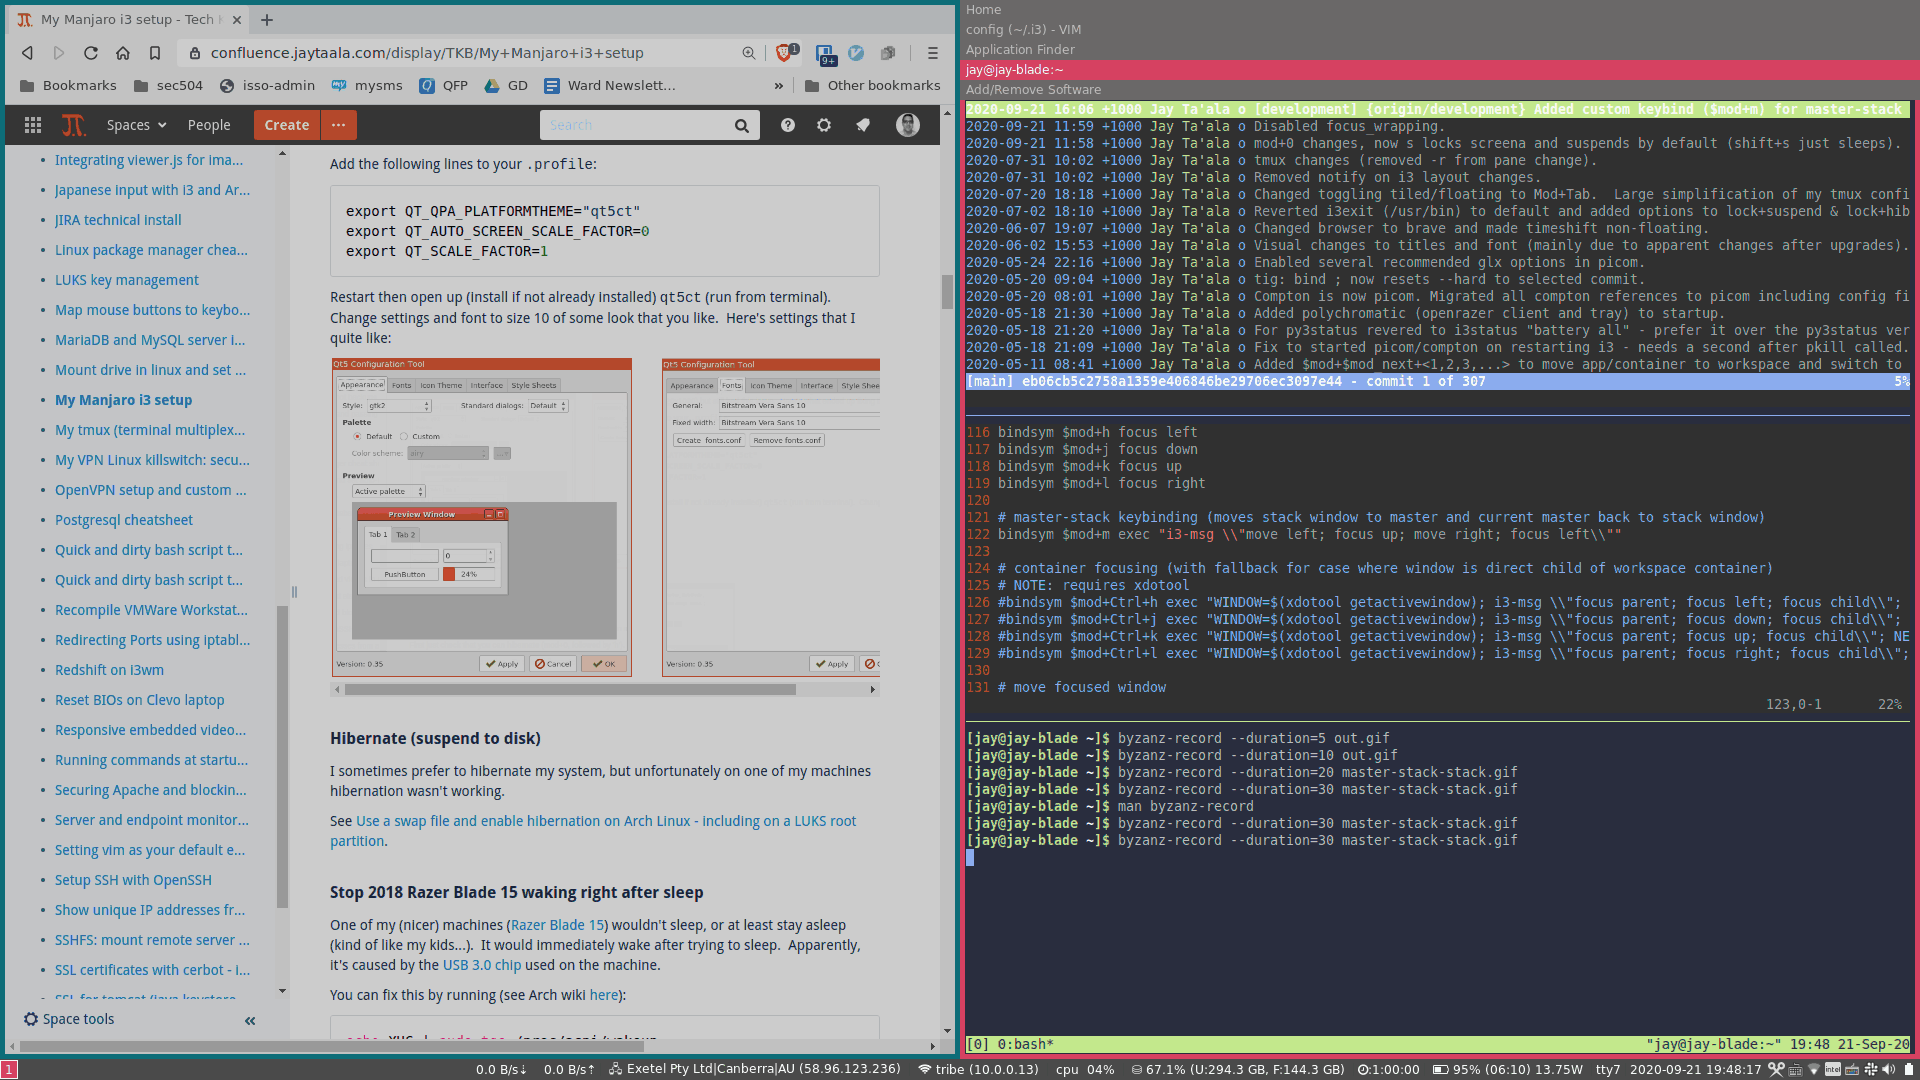
Master-stack (stack-stack) swap stack window with master keybind
I find myself now generally using a "master-stack" approach to window management with i3. More specifically, I have two "stacking" layouts (horizontally) side-by-side, like so:
That is, I have a "master" stacking layout on the left and use a "stack" stacking (or splitv) layout on the right.
Now, i3 is a manual tiling manager which means that to move windows you can move window manually from the "stack" layout to the master - however it won't automatically move the current "master" to the "stack" layout when doing so (other dynamic tiling managers usually do this in a master-stack layout).
We can however, simulate this basic concept with a bindsym which will move the focused "stack" window to the right (the "master" layout), focus up (to select the currently selected "master" window), move it right, and then focus on the (now new) master window. Add the following to your i3.conf file (I've found $mod+m works well for me):
| Code Block |
|---|
# master-stack keybinding (moves stack window to master and current master back to stack window)
bindsym $mod+m exec "i3-msg \\"move left; focus up; move right; focus left\\"" |
Quick demo of using the above bindsym to switch windows in master-stack layout:
Window Management and various other implementations in i3
My usage and window management approaches in i3 have evolved over time - and continue to evolve. If you look through my dev branch you'll see many changes and things tried (and reverted) as I've slowly tried out things until I've found what works best for me. That's one the many things I love about i3 (and linux in general).
...
My "special" window combiner bindsyms
...